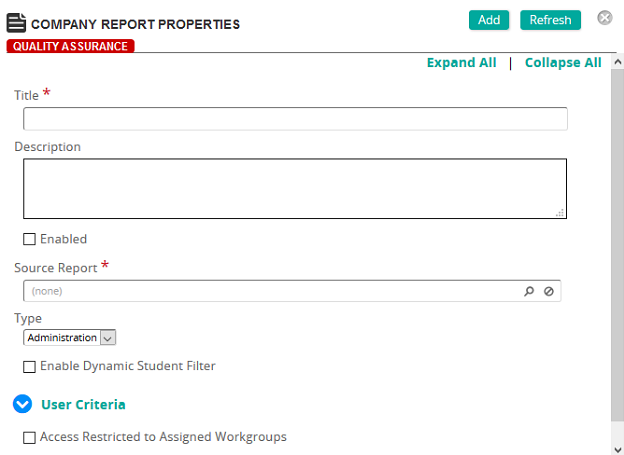
On the Company Report Properties page, you define the properties for a company report. The fields on this page vary based on the type of report selected.
Fields
Title: Type the title for the company report.
Description: Type a description for the company report.
Enabled: Select this box to enable the report for viewing as an administration report in the My Reports tab for all privileged Administrator users. For scheduled reports, select this check box to enable the report to run or leave unchecked to disable the scheduled report.
Source Report: Click  to search for and select an existing report to be used as the source to generate the report.
Type: Select one of the following:
- Administration
- Student
- Scheduled
The selection you make controls the remaining fields on this page.
Enable Dynamic Student Filter: (Administration) Select this box if the report is to be used to generate data dynamically for a group of students. Dynamically filtered reports are administration reports "pushed" to the My Reports tab by an administrator with privilege to the Company Reports tab. Dynamically filtered reports can be used to generate a report for a list of students.
Access Restricted to Assigned Workgroups: (Administration) Select this box if you want the report to be restricted to specific workgroups. Select the workgroup or workgroups from the Available list and move them to the Assigned list.
Direct Link: (Student or Scheduled): A system-generated direct link to this company report. You can copy this link and provide to supervisors so that they can link to a report, which is filtered by their direct reports.
Note: For the direct link to work, a user must be authenticated.
Filters: (Student) Select one of the following:
- None
- Filter by Current Student
- Filter by Current Supervisor
Assign To: (Student) Select one of the following:
- All Students: Allows all students access to the company report.
- Student Criteria: Displays additional fields to use to restrict access. You can restrict which students can access this report by job, organization, group, and job category.
Starting: (Scheduled) From the calendar and time pop-ups, select the day and time when the server is to run the scheduled report.
Note: Starting time is an approximate time when the server schedules the report to run. If the job queue is busy at that time, the starting time may be delayed slightly.
Scheduled to Run: (Scheduled) Select a schedule option. Options are:
- Once: The report runs once on the day and at the time indicated.
- Once a Day: The report runs once a day (Monday through Sunday) at the time indicated.
- Once a Weekday: The report runs once a weekday (Monday through Friday) at the time indicated.
- Once a Week: The report runs once a week based on the starting date at the time indicated. For example, if you want a report to run once a week on Wednesdays, the starting date must be a Wednesday. If you want a report to run on a weekend day, the starting date must be either a Saturday or Sunday.
- Once a Month: The report runs once a month based on the starting data at the time indicated. For example, if you want a report to run on the 7th of each month, the starting date must be the 7th.
Download Link: (Scheduled) This is the link for the scheduled report. It can be passed to users in email, through a notification, or copied and pasted. The link is secure in that only authenticated SilkRoad Learning users who have permissions can view the report.
Note: The message, Unavailable until the report has been added, appears when you are adding the scheduled report for the first time. The message is removed after the report is added.
Run Now: (Scheduled) Click this button to run the scheduled report now. This option overrides the scheduled time and runs the report on demand.
Note: Running the report on demand does not change or prevent the report from running at its scheduled time.
Download Latest: (Scheduled) Click this button to download the latest version of the report. You can open the link or save it to your desktop. If this button is not available, the scheduled report has not run yet.
FTP Folders: (Scheduled) If you want this scheduled report to save to a FTP folder, select the folder from the Assigned list and move it to the Available list.
Notification Rule: (Scheduled) If you want notifications to occur for this scheduled report, click Add and then select the notification rule from the Notifications page.
 User Criteria
Access Restricted to Assigned Workgroups: This check box controls whether the report is restricted to users assigned to a specific workgroup. If selected, this report is restricted to users in the specific workgroup or workgroups. If not selected, any authenticated SilkRoad Learning user has access to this report.
Workgroup: To assign workgroups, click a workgroup or workgroups from the Available list and use the arrow buttons to move them to the Assigned list.

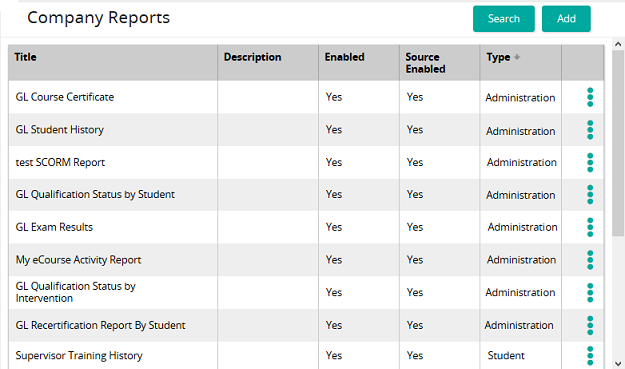
 Company Reports page opens.
 Company Report Properties page opens.
