|
|
|
Add a new workflow template
- From the navigation bar under Appraisals, select Manage Workflow Templates.
The Workflow Templates page opens.
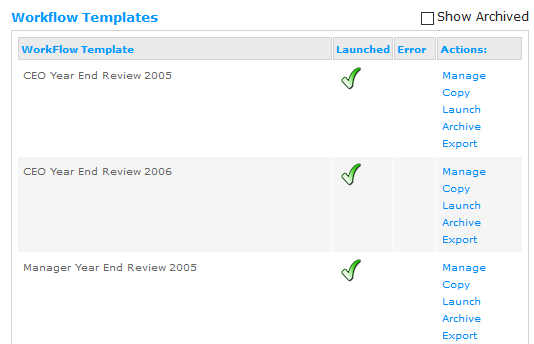
- Click the Add link in the Actions column.
The Workflow Template page opens.
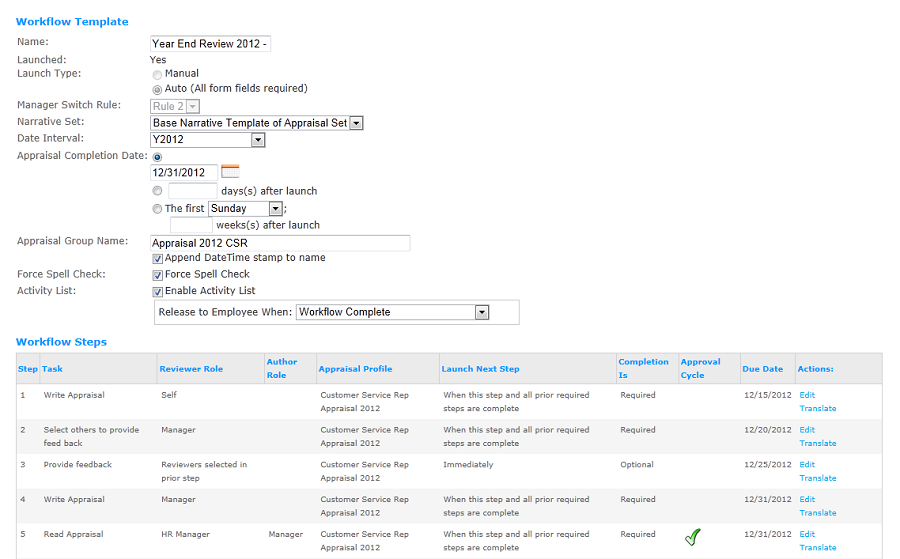
- Enter a name for the new template. This should be a unique name for your workflow.
- Select the launch type using the radio buttons. Most customers will use the Manual launch type, having the Client Administrator manually launch the appraisal. Auto launches are triggered by a date, such a work anniversary date.
- Use the Manager Switch Rule drop-down field to specify how To Do tasks and forms are transferred from one reviewer to another when an employee’s manager changes. Four pre-defined rules are available for selection:
- Rule 1 – Reassign All Forms and Tasks – If an employee’s direct manager changes and Rule 1 is configured, all of the To Do tasks and forms from the prior direct manager are reassigned to the current direct manager.
- Rule 2 – Reassign Active Forms and Tasks – When Rule 2 is configured, all the active To Do tasks and forms from the prior direct manager (i.e., tasks and forms that have not been completed) are reassigned to the current direct manager. In some instances, when a direct manager’s active form is also referenced in a prior completed task, the completed task will also be reassigned to the current direct manager.
- Rule 3 – Copy Active Forms and Reassign Active Tasks – Rule 3 is similar to Rule 2; however, the content of the prior direct manager’s form is copied to a new form created for the current direct manager. The prior direct manager’s form is still exists.
- Rule 4 – Don’t Reassign Active Forms and Tasks – When Rule 4 is configured, the current direct manager is given a new, blank form. The prior direct manager’s form still exists, but the current direct manager cannot view it.
- Choose the Narrative Set using the drop-down menu. Most customers will use the Base Narrative Set; however, you can create additional narrative sets.
- Using the drop-down menu, select the Date Interval. The date interval is the start and end date for the Appraisal period.
- Select a completion date by typing in the date or by using the
 calendar icon. For auto launches, choose the completion date as a defined number of days or weeks after launch.
 - You may enter a unique name for the Appraisal Group Name or leave it set the default name. The Appraisal Group Name is used for auto launches.
- Optionally, choose to have a Date/Time stamp and force spell check. It is recommended that you append a DateTime stamp to the group name to keep it unique. When you choose to force spell check, upon saving your appraisal, spell check is automatically started.
- Check the Enable Activity List check box if you want the reviewers to create an Activity List during the appraisal process. The Activity List can be edited on the Write Appraisal step and viewed on the Read Appraisal and Manage Meeting steps. Activities in the Activity List are released to the employee’s Development Plan at a preconfigured step in the workflow. Use the Release to Employee drop-down field to select the preconfigured step. The Activity List’s release can be coordinated with the release of appraisal forms to the employee.
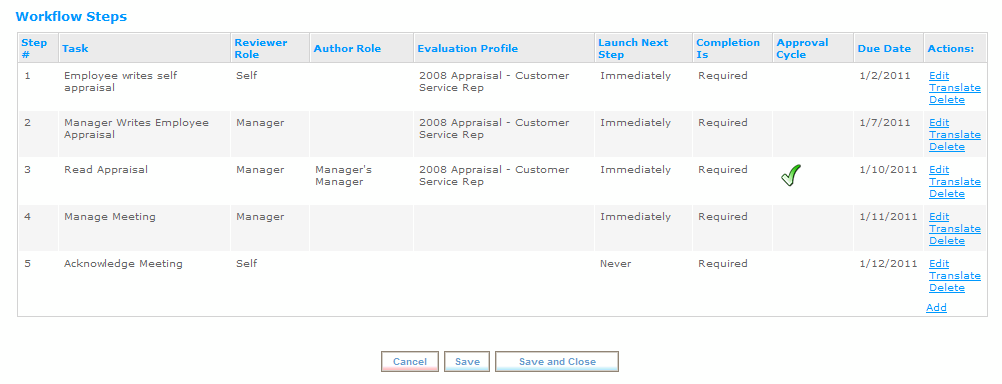
- Click Save to create the new workflow template and begin adding workflow steps.
- Click the Add link under the Actions column to add your workflow steps.
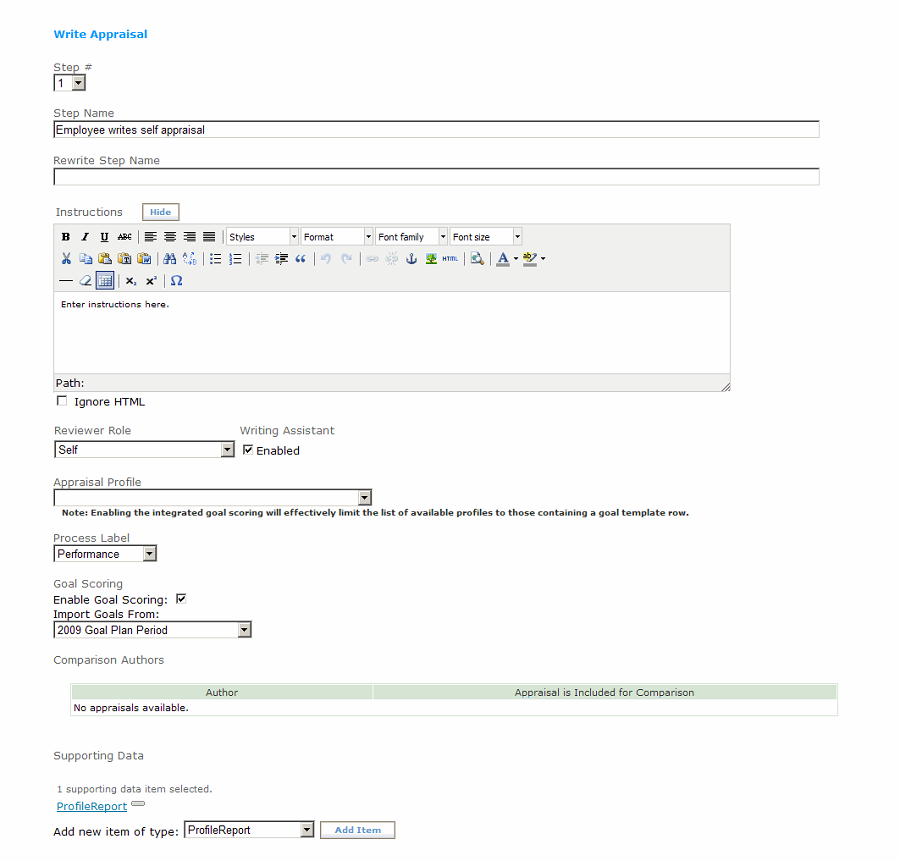
- Select a Task from the drop-down menu and click Next. In a typical workflow, the first task is a Write Appraisal task.
- Choose a Step number for the task. This determines the sequence of the tasks.
- Enter a Step Name and Instructions in the text boxes. This is the information sent to the assignee. The instructions field text box uses a WYSIWYG editor.
- Enter a Rewrite Step Name if you plan to add a Read Appraisal step with an Approval Cycle. When the Reviewer on the Read Appraisal step requests a rewrite, the Write Appraisal task for the Author is reopened and the To Do task name contains the Rewrite Step Name.
- Select a Reviewer Role using the drop-down list. The reviewer role is used to identify the person assigned the task.
- If you have previously mapped the Writing Assistant phrase library to the Appraisal Profile configured for this step, you can choose to enable the Writing Assistant for this step. This will make the Writing Assistant available when the Reviewer enters Comments on the form.
- Select the Appraisal Profile. This is the type of appraisal such as a 90 day appraisal or year-end appraisal.
- Optionally apply a Process Label using the drop-down list. The Process Label is used in conjunction with the Meta-Data Tag on the Profile to identify data that is to be extracted and used for a variety of reports and as input to other processes. (Please see the section on Report Metadata in this document for more information.) Process Labels can only be selected for a Write Appraisal step.
The Process Label can be applied before or after an Appraisal is launched.
- If your company is using the Goals (Performance Planning) module you can enable goal scoring by:
- Placing a check mark in the Enable Goal Scoring check box field.
- Selecting the import period in from Import Goals From drop-down field.
- Checking the Weights and/or Scores check box fields to import this data.
The Appraisal Profile used in this step must also have a Merge String configured for GoalTemplate on Level 2, 3, or 4.
- If available, you can choose to display authors from prior steps. This will allow the data from a prior Write Appraisal step to be displayed as read-only data on the form along with the author’s name. The prior step must 1) be configured to be completed before this step is launched, 2) use the same Appraisal Profile as this step, and 3) have a different Reviewer Role than this step. For example, you may want to include the employee’s self appraisal for the manager to view while he/she is completing the appraisal.
- (Optional) If you want managers and employees to be able to view and copy comments and ratings from previous reviews while completing an end-of-year review, turn on the Display Previous Appraisal Data feature. This feature makes it easy to view and compare data from previous appraisals when working on current appraisals.
The requirements to use this feature are:
- The prior workflow must be different from the current workflow
- The prior workflow must have a launch associated with it
- Both workflows must contain the same form
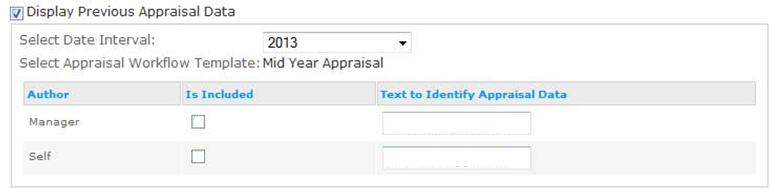
- Select the Display Previous Appraisal Data check box.
- Select a date interval.
- Select the appraisal workflow template.
- Select the Is Included check box for each of the authors.
- Enter text to identify the appraisal data on the appraisal form.
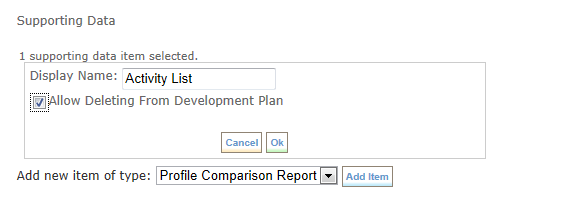
- Optionally choose to include Supporting Data, allowing you to easily add employee data to an appraisal form. The administrator can link to:
- Forms filled out in prior workflow steps.
- Assessor Initiated Assessments (AIAs) filled out during the date interval associated with the appraisal workflow launch.
- A report history page for the employee.
- An external web address.
The information is made available to the user completing the appraisal by clicking the link at the top of the appraisal form. Supporting data can be configured on the Write and Read Appraisal steps.
Follow these steps to add supporting data.
- Select the item from the drop-down list and click Add Item.
- Items can be removed by clicking on the
 icon.
icon.

- If Enable Activity List is selected (see step 11), in Supporting Data optionally choose to include an Activity List on the Write Appraisal, Read Appraisal, and Manage Meeting steps. The Activity List can be edited on the Write Appraisal step and viewed on the Read Appraisal and Manage Meeting steps.
- Follow these steps to add an Activity List
- Select Activity List from the drop-down list and click Add Item.
- Click the item to edit.
- On the Write Appraisal step, optionally enable Allow Deleting From Development Plan. When selected, this allows the employee to delete activities from their Development Plan that were originally selected on this step.
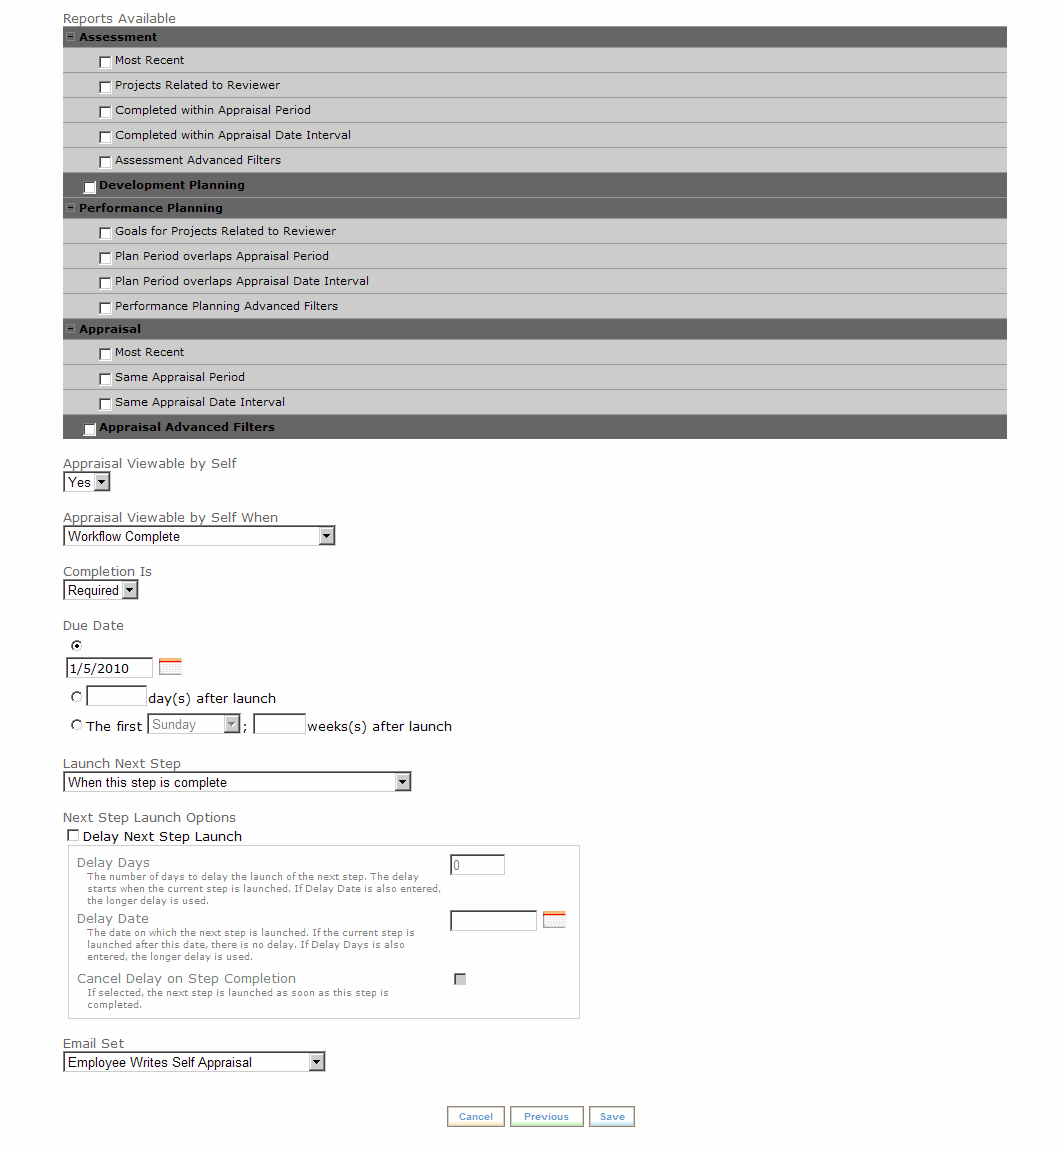
- Optionally choose to include additional reports from the list of available reports. Use a check mark to select the reports you want to include. Most customers use the default system selected reports. The reports are included in the Appraisal launch. The person completing the Appraisal can view the selected reports by clicking on the show option at the top of the appraisal.
- Choose if you want the appraisal to be viewable by self and at what point in the process it can be viewed. For example, you may want the assessee to be able to view the appraisal but only when the workflow (appraisal process) is complete.
- Determine if you want the completion of the task to be optional or required. You will most often want to make the completion required.
- Enter a Due Date using the using the
 calendar icon. For auto launches define the due date to a number of days or weeks after launch. The Due Date entered is the default value for the step. When an appraisal workflow is launched manually, it can be overridden in the launch wizard.
 - Using the drop-down list, choose when to launch the next step. Options include launching Immediately, Never, When this step and all prior steps are complete or When this step is complete. Optional steps must have Immediately selected. This will prevent the workflow from becoming stuck on an optional step.
- Optionally choose to delay the next step launch. The next step can be delayed by a number of days or delayed to a specified date. It is important to note that if a delay is selected, it will impact the task by delaying the next step launch. Also, if the step is launched after the delay date and Delay Days is not set, there is no delay. In addition, the delay can be canceled upon task completion by placing a check mark in the Cancel Delay on Step Completion check box.
- Select the email notifications. Email notifications are sent to the individual completing the task.
- Click Save.
- Add additional workflow steps. When finished, click Save and Close to create the new workflow template.
Edit Write Appraisal Step
Edit Write Appraisal Step
Workflow Template with a Workflow Step
|
© 2023 Rival. All rights reserved. |

 |